On the other hand, it is hard to accept the women's bicycles although they are very popular and inexpensive.
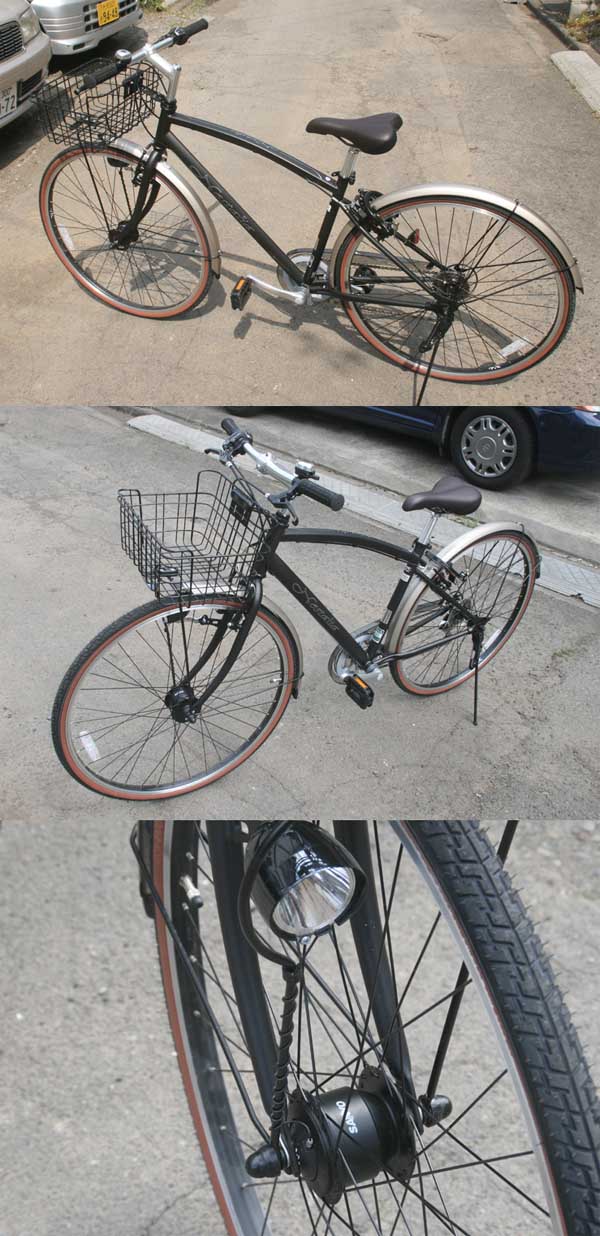
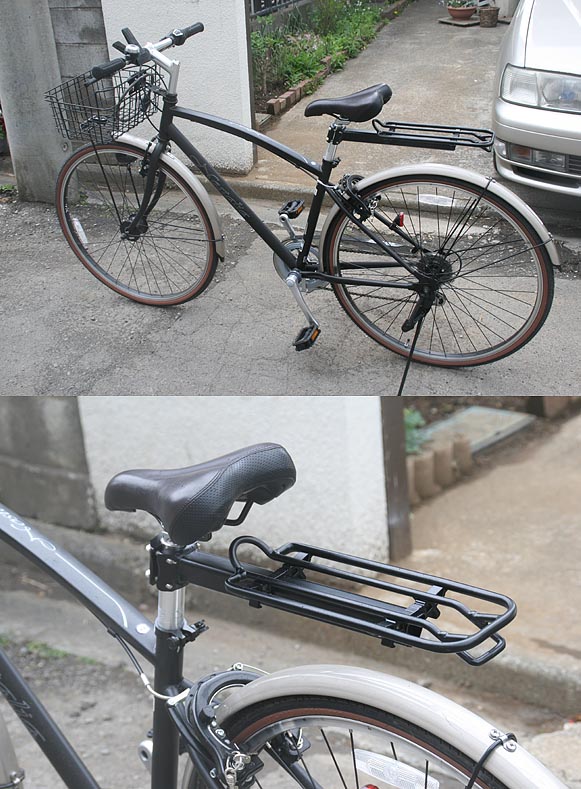
Thinking in that way, I spend many hours looking for a good one, and at last I found it. A Nice shape of frame without a rear carrier, a straight handlebar and aluminum made, the saddle is a sport type but not likely as sport type bicycle it has fenders to protect muddy water to draw beautiful lines to your back and breast which is good for practical use. The inner-hub power generator for the automatic LED light, which turns on in a dark automatically, requires only 1/5 load for the pedaling work in comparison with a traditional wheel drive generator. A front carrier has a nice design different from the women's bicycle. It has a powerful brake system so-called V-brake with a six-speed derailleur. The wheel size is 27inches and good for a big man like me.
Even though being full of such strong points, it is sold in a home center at only JPY18,800 as it had a small scrach on the rear fender.
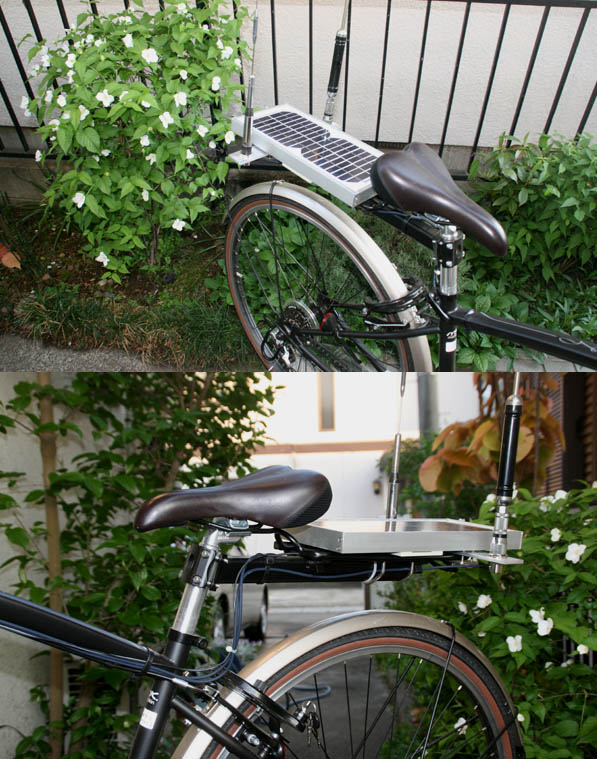
Well, fine, it does not have a rear carrier because it's a sporty type bicycle. I don't care because I'm not intending to get passenger on, however, nothing is problem for mounting the antenna for radio. So I ordered a rear carrier beign sold as a part for the sport bicycle. It is small but is very solid and easy to be fixed firmly to the saddle post pipe. It is good for mounting antenna base to it. It costed me JPY2,000.
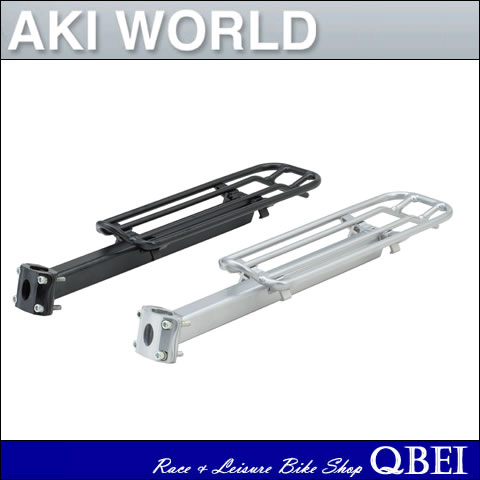
So I mount it to the bicycle anyway. It is nice that the postion of the carrier can be higher than normal rear carrier because it is mounted to the saddle post pipe.
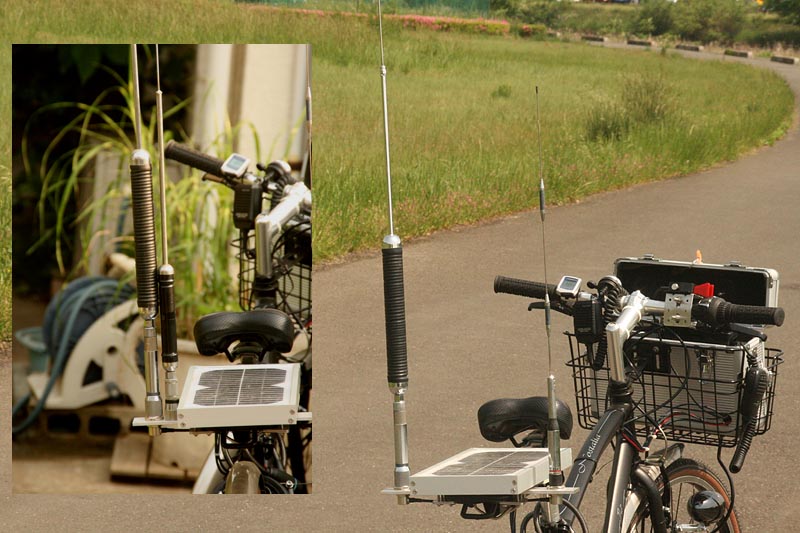
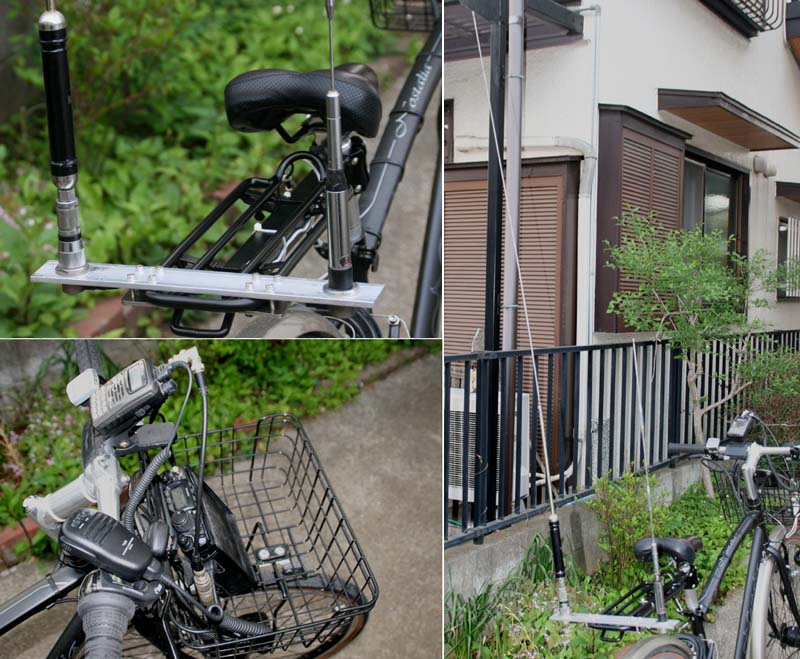
Processing a 5mm thick aluminum panel, I mounted two connector kit for the mobile whip antenna. One is for 430MHz to communicate with local friends, while the other one if for HF bands to work DX!
For 430MHz, I decided to use an old whip antenna that I had in a junk box. Problem is an antenna for the HF bands. Fortunately, I have a long history fighting with the mobile antenna so far, so I know what to do.
The system in my current mobile station is one of the answer from the all the effort in the past, and I tried to use it in my bicycle as well.
That is, a whip antenna being resonanced at any frequency lower than 10MHz (i.e., the electrical length of the element is longer than 15meters.) with the ATU(Automatic Antenna Tunner) to get resonance for all bands in HF.
I built a base loading whip antenna with using junk parts of antenna that I had. Connecting a M-connector for whip antenna, with a screw pitch convert adaptor, and then with a loading coil for 7MHz(?) for an old commecial made center loading bumper whip, I completed important part of the whip antenna in a good shape. I added a stainless whip wire soldering to the top of the coil, and finally a 1.3m long base loading whip antenna is completed. I have not measured the resonant frequency, but cheking SWR with the antenna analyzer, SWR droppes at 6.8MHz, 19.6MHz, and 48MHz. If I touch to the body, it drops to 1 to 1.1, so I am sure that the ATU can get tune for most HF bands without any problem.
I tried to use it with YAESU FT-817 putting in a front carrier driving around neighbours. I was happy to see the signals on 7MHz band were comming through loudly from S7 to S9+. It was my first experience to hear the signals on HF in the bicycle, but it is really strange and unusual feeling! Very good, I think it will work OK. I felt that I could work even DX from my bicycle now.
Now, I have to think about the power system. There would be no other choice for the battery other than the sealed battery for this purpose. What I have to think about is a charge system.
A standard generator for the bicycle is 3W at 6V, and if we try to step up to 12V (by a double voltage rectification), the power is reduced to 1.5W (100mA of charge current), which is very small. In addition, the standard figure for the bicycle generator is measured at 15Km/h of speed constantly.
So, what I was interested in was a solar energy which is paied much attention under current ECO boom.
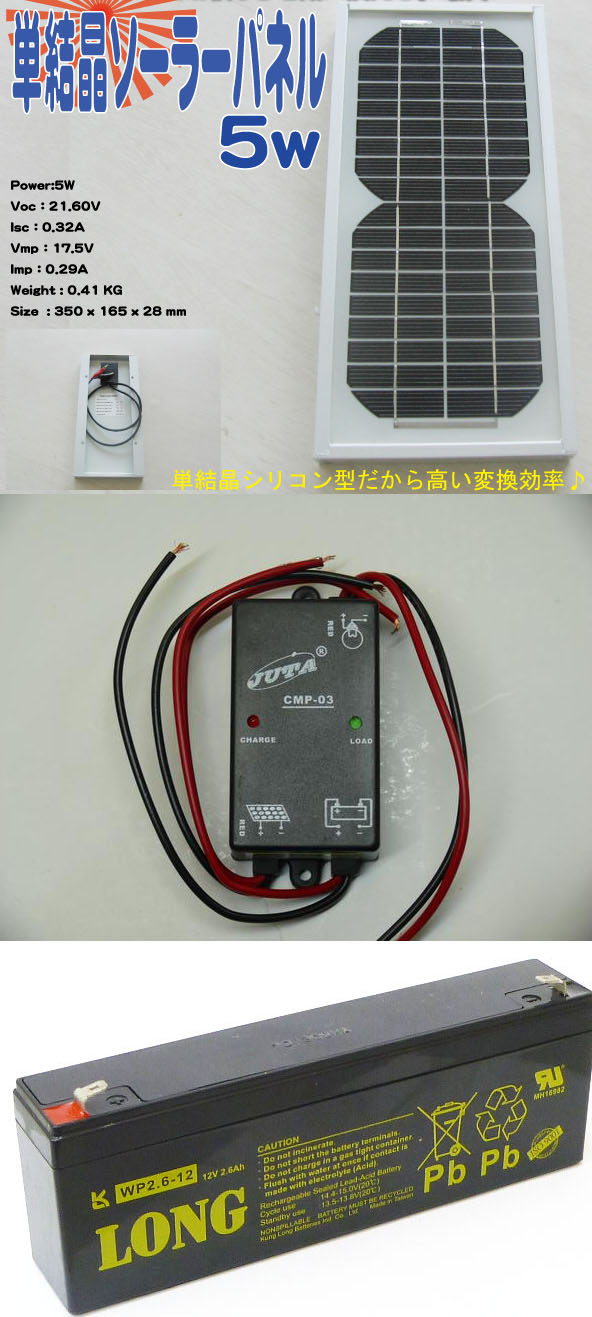
The solar panels have been available in the market, but it used to be very expensive despite the capacity of generation was relatively small. However, I found it out that now, thanks to China's economic growth, a Chinese solar panel of 21.6V for opened voltage, 17.5V for loaded voltage which is just fit for charging 12V battery is sold at only JPY1,980 (US$24.50)!! The size of the panel is just fitable to the rear carrier of my bicycle!
I also found a very cheap charge controller in the internet, and bought it at JPY1,200. I bought a Taiwan made 2.6Ah sealed battery at JPY2,000 in Akihabara.
The solar panel is now mounted safely. I was lucky to find one which fits to the carrier perfectly.
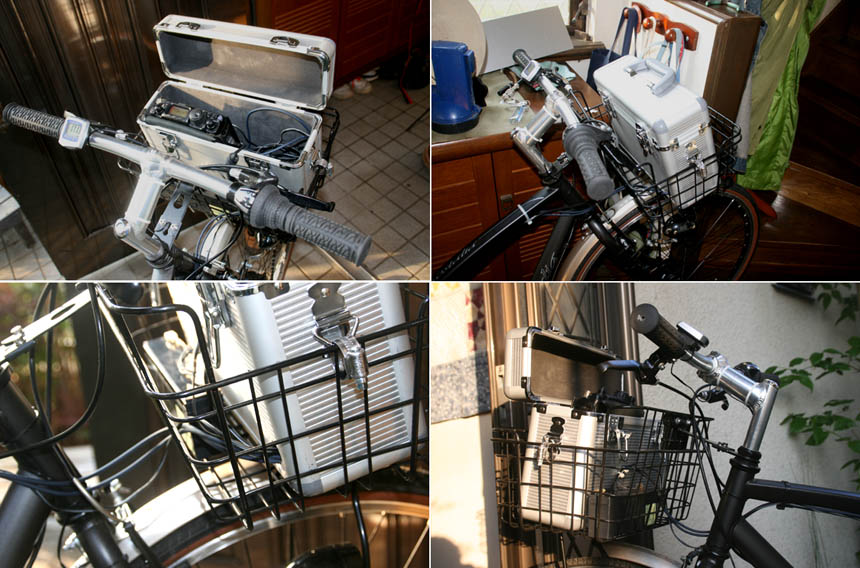
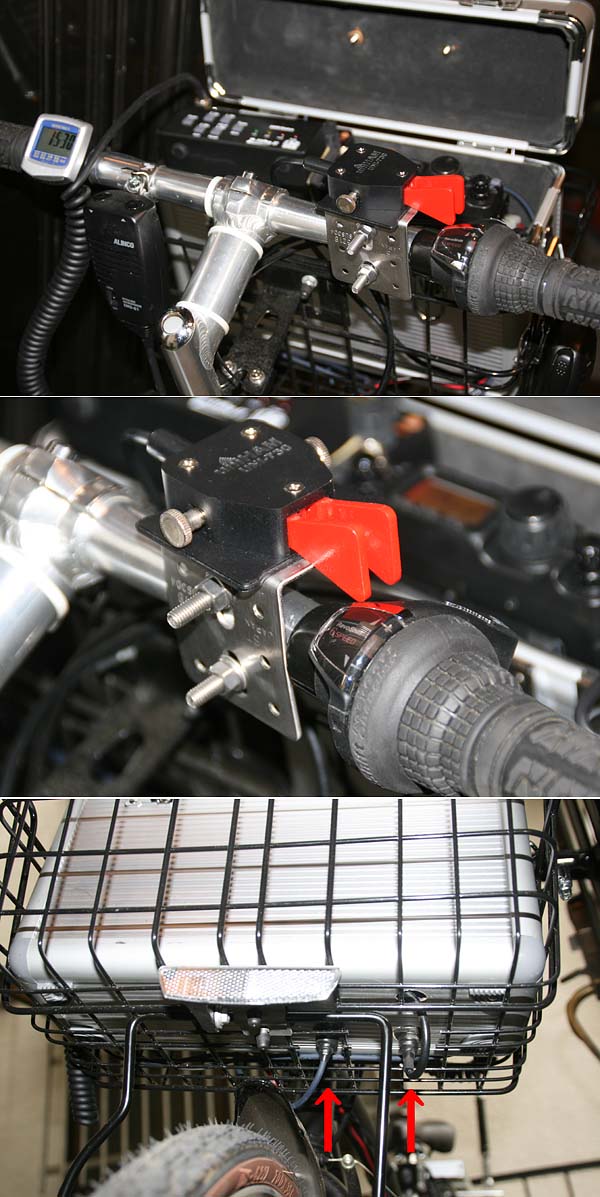
Well, now, installation of the radios. I think this is the most difficult point for a bicycle mobile. I hate to use a handbasket to carry the radios in it to put it in a front carrier of bicycle to operate, and take it away when I leave from the bicycle. As long as radio instruments are not fixed to the bicycle, that is not a bicycyle mobile!
If we try to fix the radios to the bicycle, we will be faced to several problemes.
1. How we fix the radios to where it's easy to operate.
2. How we protect radios when we have a sudden rain fall.
3. How your realize security when you park the bicycle for a short time in daytime.
4. We have to keep the safety for driving bicycle, paying attention to the balance of and load to the handlebar.
First of all, I have to clear all of these requirements.
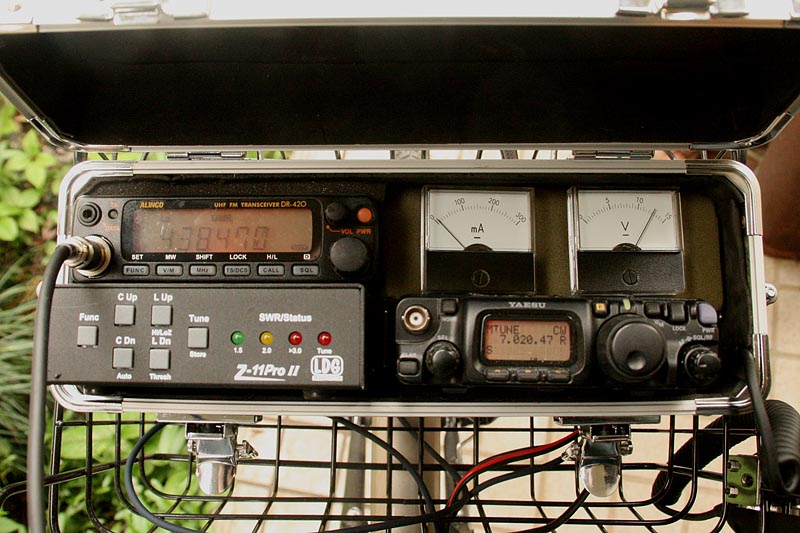
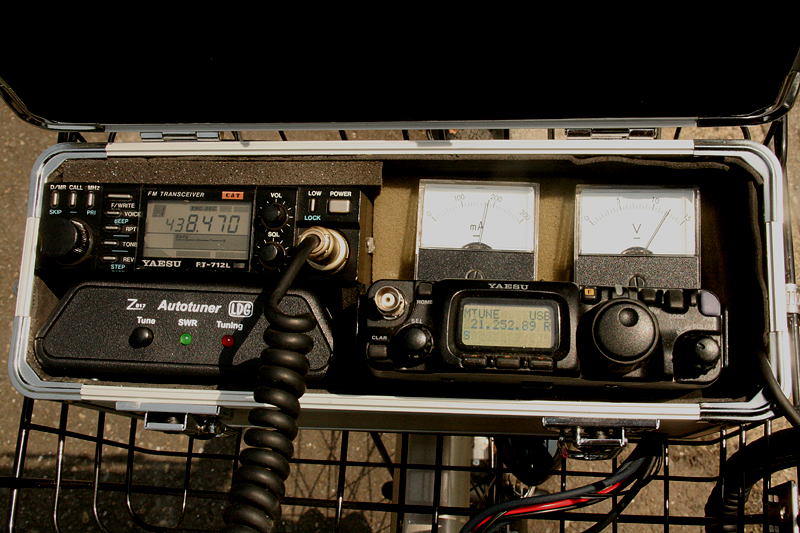
Radios that I am planning to use are ALINCO's Transceiver DR-420 for 430MHz FM (use it at 5W), and YAESU's transceiver FT-817ND for HF bands(5W).
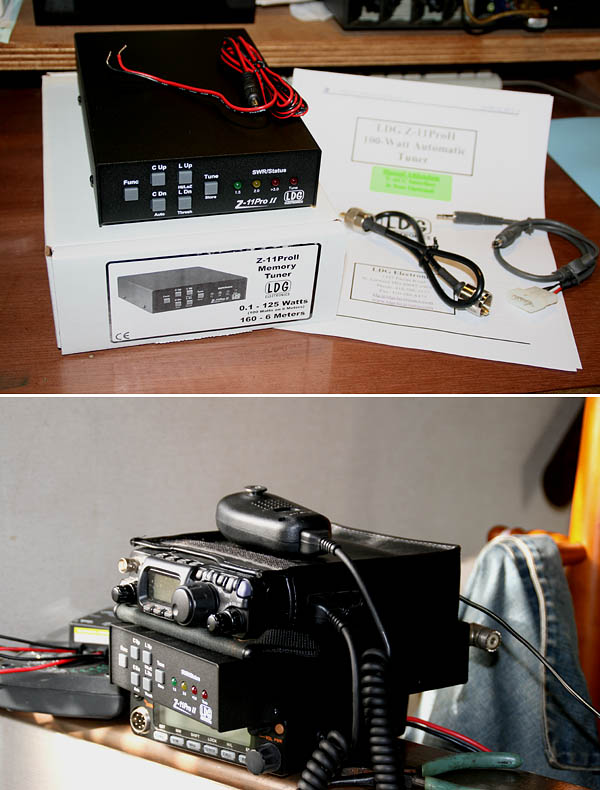
LDG has nice ATUs which are very inexpensive and small. The cabinet size is the same as FT-817ND and DR-420, so considering it, I examined how to install on the bicycle.
In the beginning, I was trying to make a structure using aluminum chassis, panels, and angle bars, however, when I recognized that the measure to security and rain are essential, I started to visiting home centers to find a suitable commercial made structure.
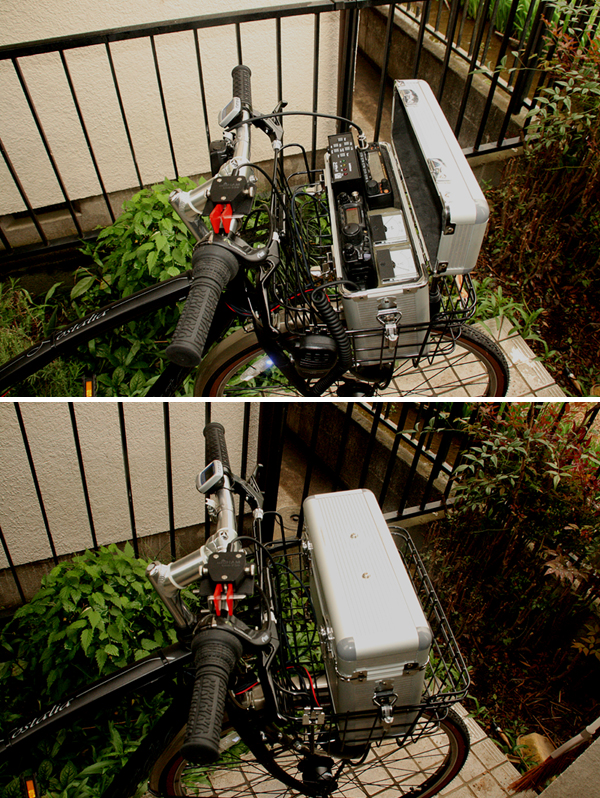
There you are! A very rare upper door type aluminium box in the shape of attache case! Its depth is just good for radios that I am expecting to use to come in with the direction for the front panel to be upwards. Its width is exactly the same as front carrier of the bicycle, which is 31cm! It can protect radios from the rain drops! Key lock OK! But it costs only JPY1,980! This is what I wanted! Lucky me!
I used two stainless clamp with screw fastener for the installation it to the front carrier very tightly and firmly. As I fastened the screw so tightly, the box is completely fix to the carrier. I opened a hole at the right below of the front side of the box, so that the coaxial cables and power cables can go through. So, there would be no possibility for the radios to be stolen during the parking for a short time in daytime. (For more security, I will lock the bicycle to the pillar of the building fence, etc. using a locking chain.)
If I have a sudden rain, all I have to do is just close the door(cap) of the box. (A handle of the box in the picture was removed later, as it was not necessary.)
LDG's ATU(Automatic Tunner), Z-11PRO2 arrived at home taking three days by UPS since my order via internet. The price is US$159.00, but due to current historical JPY's appreciation, it costed only JPY12,900.
Z-817, which is designed especially for FT-817, is much cheaper, 30 dollars less than Z-11PRO2. However, Z-11PRO2 accepts up to 150W, has three colored LED to indicate five degrees in SWR, which is very easy to check, and it starts tuning automatically during the transmission of SSB/CW once it detects exceeded value than preset SWR. Considering these adventages, I decited to by Z-11PRO2. If you put importance in the cost, Z-817 has a very reasonable price, less than JPY10,000. It is far cheaper than national made manual tunner for QRP!! The picture shows the three equipments being piled up. Their size are almost the same.
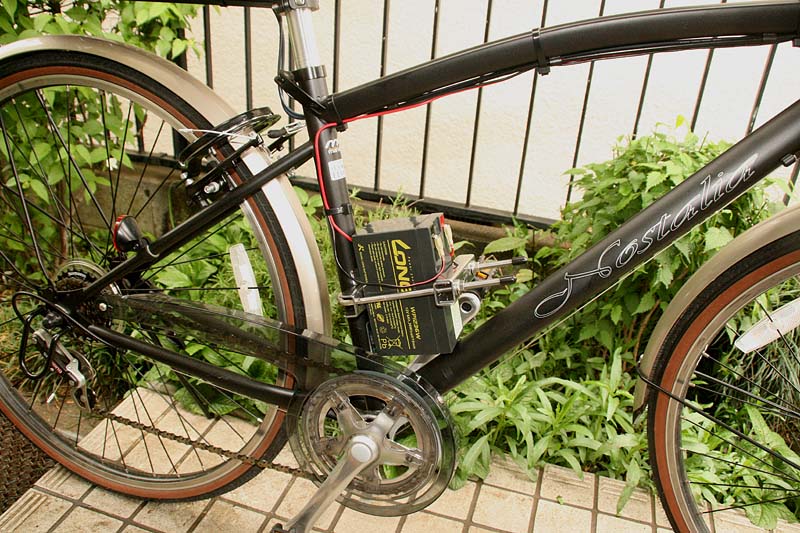
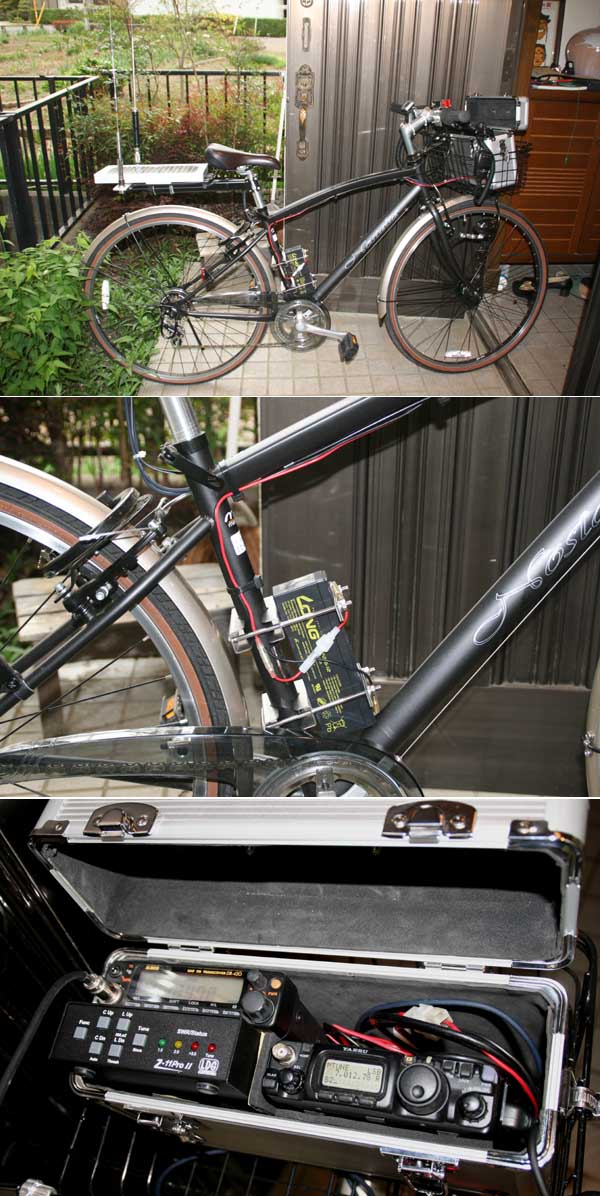
To avoid the concentration of the weight to the front carrier, I installed firmly the battery to the frame below the saddle using stainless clamps.
This seems to be a right place, and I do not feel any influence to the drivability of the bicycle.
All the equipments could be installed in the box. The door(cap) is able to closed properly. I anyhow insert some cushionings and try use it to see what gon'na happen.
Under the severe conditions of operation and QRP, CW must be a mode inevitable. So I have to think about the paddle.
I was lucky that I already had a small paddle made in China (It was only JPY7,000.) for the portable operation of FT-817. So I removed a top mechanism from the heavy basement, and install it to the L shape stainless plate with screws, and then the plate to the handle bar of the bicycle with U-bolt. It's amazing that the feeling is nice and very easy to operate even while driving around!
I had to open holes at the bottom of the box to connect the cables from the outside. It was something I had to do when I found the the depth of the cabinet of the ATU was a little bit longer than expected and the door(cap) of the box could not be closed, hi hi.
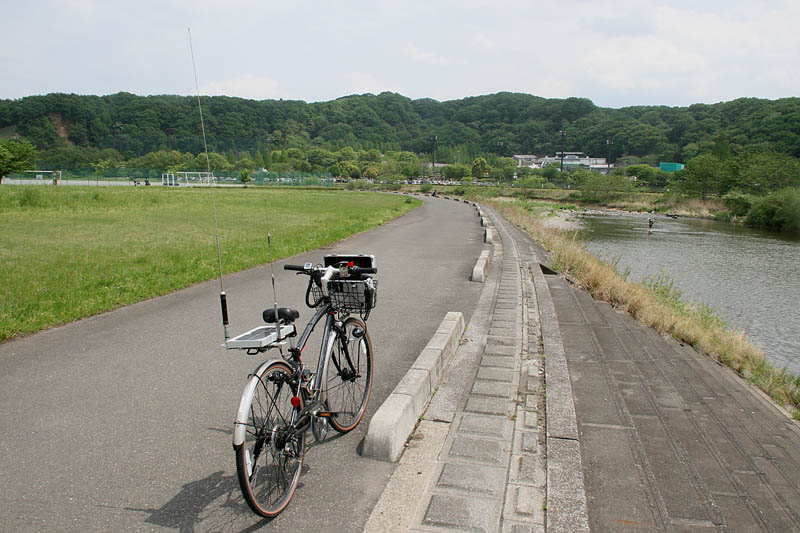
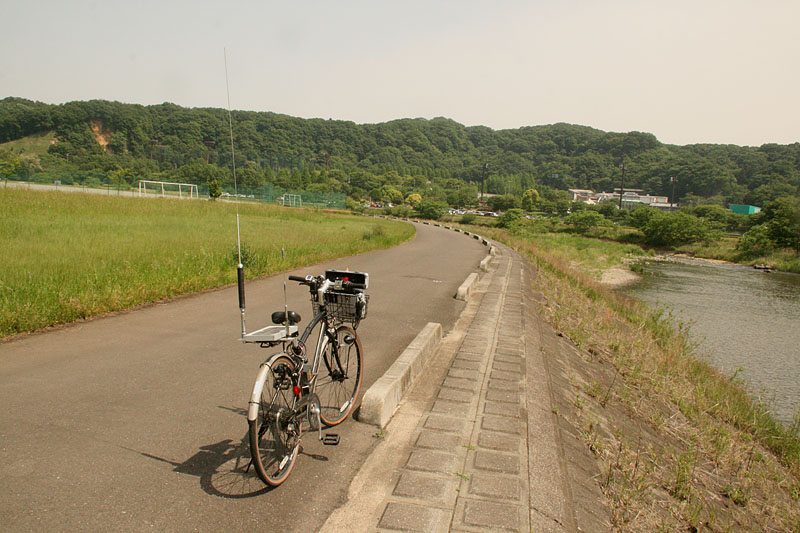
Anyway, an experimetal bicycle has been completed. So the time for debut QSO has came.
I drove relaxing in the park in the riverside area of the Naguri River with a beautiful feeling!!
But I can't help getting embarrassed when I pass by other people there!!
First of all, I cheked the ATU's function.
To my surprising, tune was succesful for 3.5MHz (less than SWR 1 to 1.5) with the first try!
Other than this band, 7/14/18/24/28MHz were all successful as well, while 10/21/50MHz were failed. It simply depends on the impedance of the element (All the ATU are unable to tune to an integral multiple of 1/2 wave length of the frequency, so it is ideal to calculate the suitable electrical length of the antenna for all the frequency to be used and adjust the antenna to it.), so if I change the inductance of the coil or the length of the element of the whip antenna, these results are easy to be changed.
I thought a counter poise wire would be essential for a small body of the bicycle to get enough ground effect, but actual experimentals in the garden showed it is not needed. So these results are without any counter poise. It is absolutely more than expected.
As the bands above 10MHz were not well opened, I firstly tried 7MHz CW.
Even in a bicycle mobile, lots of strong signals are coming in on 7MHz. Some are S9+.
As today is a holiday, there are many stations operating at portable for JCC/JCG award. It's a good chance for me, so I tried to call them.
I was very srurprised that I had a call back!
I was excited and worked two more stations as below.
12:00 7.013MHz JH0PPU/0 (Portable Niigata prefecture) 599-599
12:27 7.011MHz JO1MOI/1 (Portable Saitama prefecture) 599-599
12:30 7.014MHz 7N3CNW/9 (Portable Ishikawa prefecture) 599-599
Wow! Bravo! Bravo! This feeling of satisfaction is far more than mobile in automobile.
It is worth to experience such an embarrassment. I'm feeling so refreshed!